
|
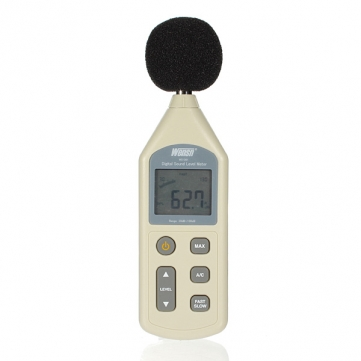
Reverse Engineering the USB Protocol on the WENSN WS1361 Sound Pressure Level Meter
|
Reverse engineering the USB protocol will allow us to write custom logging software in either Windows or Linux. While this device has DC out, there were a myriad of problems that became insurmountable. The USB readings give us a 1:1 log of what the device is reporting.
|
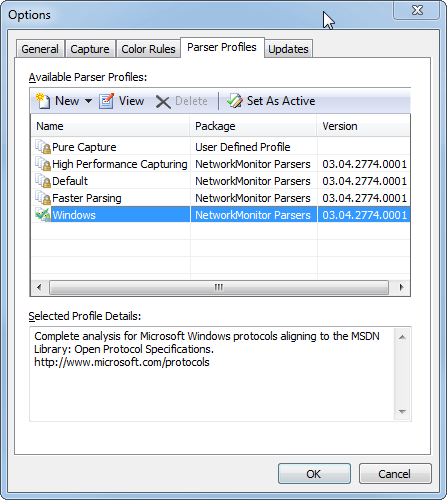
- In Network Monitor, click the Open Capture button on the upper-left, and locate the capture file that was created. It will be located in the same folder as the elevated command prompt was run. The file type and date stamp will identify the file
- In the Display Filter section, enter the following (the hex vendor Id is for this device):
USBPort.USBPORT_ETW_EVENT_DEVICE_INITIALIZE.fid_USBPORT_Device.idVendor == 0x16C0 OR
USBPort.USBPORT_ETW_EVENT_DISPATCH_URB_FUNCTION_CONTROL_TRANSFER.fid_USBPORT_Device.idVendor == 0x16C0 OR
USBPort.USBPORT_ETW_EVENT_COMPLETE_URB_FUNCTION_CONTROL_TRANSFER_DATA.fid_USBPORT_Device.idVendor == 0x16C0 OR
USBPort.USBPORT_ETW_EVENT_DISPATCH_URB_FUNCTION_CONTROL_TRANSFER_EX.fid_USBPORT_Device.idVendor == 0x16C0 OR
USBPort.USBPORT_ETW_EVENT_COMPLETE_URB_FUNCTION_CONTROL_TRANSFER_EX_DATA.fid_USBPORT_Device.idVendor == 0x16C0 OR
USBPort.USBPORT_ETW_EVENT_COMPLETE_INTERNAL_URB_FUNCTION_CONTROL_TRANSFER.fid_USBPORT_Device.idVendor == 0x16C0 OR
USBPort.USBPORT_ETW_EVENT_ENDPOINT_OPEN.fid_USBPORT_Device.idVendor == 0x16C0
I found this filter on Pete’s Blog: http://pete.akeo.ie/2011/03/troubleshooting-usb-device-development.html
- Click Apply in the Display Filter section to apply the filter. This will display only the communication to the SPL
- Starting from the top, step down through the frames in the Frame Summary pane, checking for a data read as follows. In the Frame Details pane, expand the last folded section labeled:
UsbPort: Complete URB_FUNCTION_CONTROL_TRANSFER with Data
- Expand the top level folded item, then under that expand ControlTransfer. Note the SetupPacket section has a GET_DESCRIPTOR. This is a row that is not of any use to us, I think this is just querying the device to see if it is still alive:
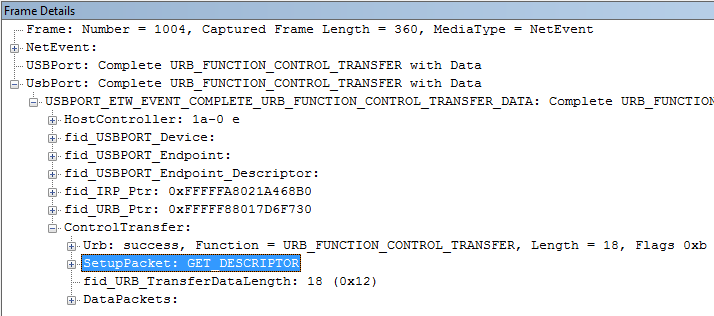
- The Frames we are interested in have an empty SetupPacket, these are the data reads:
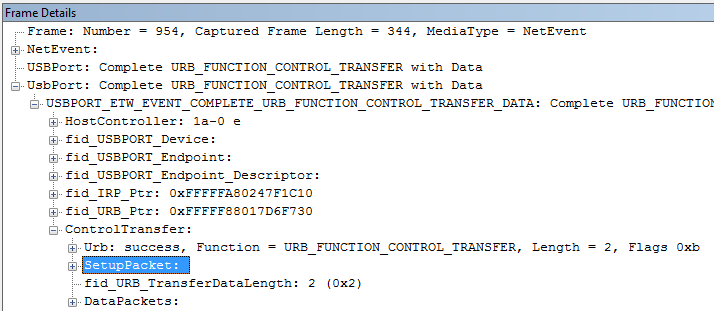
- Clicking on DataPackets shows us the data returned from the device:
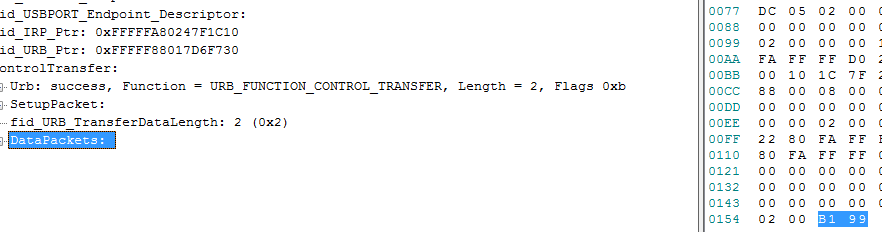
- Convert the first byte (B1) to decimal using this tool:
http://easycalculation.com/hex-converter.php
This gives us 177 - Compare this to value to the decibel level recorded in the SPL software. Because we were starting from the top of the recorded frames, this will match the first recorded decibel level. The next frame we find with an empty SetupPacket will be the next recorded decibel level etc
- At this stage we’re interested in decibel levels recorded in the 50’s or below. At the beginning of the reverse engineering I didn’t know this, but I was lucky to have started out with low numbers to make decoding the protocol far easier (as seen further on)
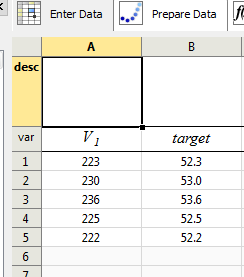
- With a selection of decibel levels and the raw recorded decimal numbers, open Eureqa Pro and enter the data as follows (you may be able to use Wolfram Alpha, not sure):
var row column A, enter ‘V1’
var row column B, enter ‘target’
row 1 column A, enter the first recorded decimal number, in column B, enter the associated decibel level
Fill the remaining rows with our data collection sample, for any decibel readings in the mid 50’s or below, do not enter any row over 55dB. This will be apparent by the “pattern” suddenly dropping off to low numbers as the decibels get higher. This is resolved later. The table should look something like this:
- In the Set Target tab, remove the default trigonometry options, then go to the Start Search tab and start the search
- Click the View Results tab and wait for a row to have a Fit of 0.000 and let the search settle (if larger equations are still being displayed, let it simplify them)
- We should now be seeing the result, which is the USB data decoded:
target = 30 + 0.1 V1
This formula applied to any V1 value will return the corresponding decibels. After the fact, this formula is pretty obvious, but when I set this up I was pushing hard for time and wasn’t particularly looking for patterns unless Eureqa failed me - To decode the higher values, Eureqa is not capable of helping us (AFAIK [yet]) from this point because ultimately it’s bitwise operations that are required, but it’s starting to appear obvious what is happening now that we have a baseline. The byte we are given can obviously only take values 0-255. After around 55.5dB, we hit the byte limit, and thereafter, we begin to see low values. So, at this point, making an assumption that we add 256 to V1 before running it through our formula gives us the correct result. The reason we are adding 256 is because the low number after 55.5dB is the ‘wrap around’ number after 255. So adding say 10 to 256 gives us 266. 266 can’t be held in one byte, so we assume that the first byte holds the wrap around (10) while the second byte from our DataPackets must have an indicator of what multiple of 256 must be added to the first byte.
The second number appears fairly random, it does not simply have a repeating value of our 256 indicators. I think this is just to throw us off. The easiest way to see where these indicators are is to convert the second byte to binary. At 55.5dB and below we are seeing values such as:
24, 152
Respectively, in binary, these look like:
00011000
10011000
Above 55.5dB, we see values such as:
25, 153, 154
Respectively, in binary, these look like:
00011001
10011001
10011010
The common factors are that the bits on the far right for decibels 55.5 and below are not set. For those above 55.5dB they are set. Note the last value, 154 has the bit set one in. This is for a high decibel level of 88.5. What this is telling us is that for decibel levels over 55.5dB, we have binary ‘1’ set, and that for a higher level again, we have binary ‘2’ set. Running tests through our formula confirms that anything with the ‘1’ bit set in the second byte must have 256 added, and anything with the ‘2’ bit set in the second byte must have 512 added. Further experimentation has shown that anything above 103.4dB sets both bit 1 and 2. So these bits to the right are actually a multiplier of 256 * 0, 1, 2 or 3.
The python code to decode decibels is (assuming we have read the first and second bytes into byte1 and byte2 respectively from our DataPackets [see down further for how we get the data packets]):
dB = (byte1 + ((byte2 & 3) * 256)) * 0.1 + 30
The byte2 & 3 part sets all the bits other than 0 and 1 to zero - this gives us just the information we need for the 256 multiplier - The next step is to do a data read dump from the device to determine the address of our wanted data. This device has no endpoints, it only has the Control endpoint, so we use the raw read/write. Generally you would need to write a command to a USB device in order for it to report back with a desired value. For this device, we are fortunate in that we don’t need to write anything, we can simply read in what we want. To find out where the data is coming from, on a device containing python and pyusb, run usbspl.py
If you don't have pyusb, run these commands (make sure you have python pip installed):
pip install --pre pyusb
- After running usbspl.pl, it will print several lines of data from different addresses. The data will look fairly meaningless. Run the program multiple times, roughly comparing the output. All of the data remains static bar one line - bRequest 4, which happens to contain 2 bytes
When we run our formula from above over bRequest 4, this resolves correctly to our decibel levels. Now it is just a matter of reading address 4 in the ctrl_transfer call to get our decibel data - Finally, it all comes together, the program usbsplloop.py has an endless loop reporting decibel levels from the SPL meter
Other References
I originally saw some hope and drew motivation to proceed from the post here:
http://www.brainworks.it/rpi-environmental-monitoring/reveng-the-usb-data
However, it became apparent that our devices are very different. The WS1361 has no endpoints (aside from Control) where the one Gianluca is using does. This changes the code fairly dramatically. Also, the methodology of sniffing the USB data is different. Because the WS1361 is using the Control endpoint, for some reason USBSnoop does not work at all. Microsoft Network Monitor works at low level, so that was able to pick up on the Control commands. The WS1361, to some advantage I think, does not require a read command to be written to retrieve the decibel level. It is constantly reported which simplifies our task to a simple read.
In locating Windows Network Monitor, I found it from a post by Scott Marchant in a stackoverflow question. Funnily enough, that question was most useful to me, however was closed as an ‘off topic’ question due to policy. Off topic and against policy maybe, but incredibly useful. Incidentally, Scott’s filter did not work for me, it returned only one row of information for the WESN, obviously skipping all the important info we needed. The filter I referenced above from Pete’s Blog seemed to consistently find all the needed data.